Remember the suitcase I made for my daughter for x-mas?
I thought I'd show how to, as I had the pleasure of making one more for my girls' best friends birthday.
I bought the ready made cardboard suitcase at a craft store and decorated it using decoupage - I used a big piece of Cicely Mary Barker gift paper. It was quite thin, so it might originally have been intended for decoupage. I hadn't done much decoupage before, and wasn't quite happy with it. All the tiny curves and corners, the glue that left white stains on the metal lock, but most of all, how the glue made the lid of the suitcase slightly bend. But all in all, the result was good.
In this box I've put two pieces of linen for embriodery (I had previously given the girl an embroidery hoop), a woollen pencil case filled with embroidery thread, and two balls of wool yarn. In the lid (an extra piece of cardboard glued on to the proper lid) I made room for scissors, measuring tape, a pair of knitting needles and a crochet needle. I also sewed up a tiny needle book.
You'll need (the pictures are pretty self explanatory, but just in case):
A cardboard suitcase
Decoupage paper or the like and glue for decoration (if you like, that is - the one I made for my daughter had very little decoration)
Gluegun (cheap, fast and super efficient)
Elastic band, about 1/2 cm wide (1/4 inch)
Stuff to go inside the box - knitting, sewing or other craft stuff
A piece of cardboard to make up the inner lid. It should be sturdy but thin - it must be able to hold the tools and the glue that fastens it to the suitcase lid (gluegun type), but you don't want it to take up too much space inside the lid.
Start by decorating the box as you please, then move on to the real work; the inner lid. I decorated this one with a single cut out - a fairy sewing tansy buttons on to a shirt (pretty pleased with that one, I admit!)
Cut the cardboard to fit inside the suitcase lid. Easiest way to do this is to place the suitcase lid on top of the cardboard and draw around the edge, then cut off a bit to make it fit inside.
Place the tools you want attached to the lid in a manner so that they fit together, making a visual before you start cutting.
Mark with a pencil where you want the elastic bands to go. Keep in mind that you'd rather want the bands to be tight than loose, or else your scissor/measuring tape/what have you might fall out.
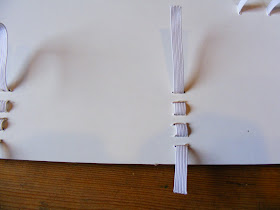
Cut slits for the elastic band with a Stanley knife. Cutting from the right side will make a prettier result.
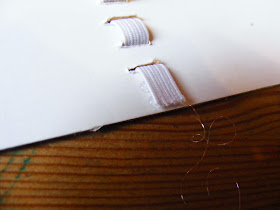
Push the band through. This photo shows my 'scissor band'; where the scissor will be.
Photo below shows the back.
Do the same for the rest of the tools - here you see my 'knitting needle band'.
Photo above shows the back.
Turn the lid around, backside facing up, and glue one end to it using a glue gun.
Place the tool in question underneath the band, tighten, and glue the other end to the back. Cut off excess band.
With the needles, I didn't glue the 'inbetween band' to the back. The band is sufficiently tight to hold the needles in place.
Remove the tools and glue the inner lid to the suitcase lid, again using the glue gun.
Put the tools back in place, fill the box with crafty goodies, take a step back and admire your work!
See the teeny tiny basket with the teeny tiny scissor and thread? :)
(Please let me know if I've invented some new words or am using the wrong ones, or anything that might make this tutorial better. Thanks!)


Arhvvv!!! Den er BEDÅRENDE!! - Alfepapir og det hele! Jeg synes jo også den vi købte var fin, men indholdet i denne er bare så meget skønnere. Faktisk var der acryl!!! garn i den fra Frankrig. Men nu må jeg da også prøve at lave en som gave. Hvor fik du fat på papiret? Den lille sy-alf en simpelthen for skøn :)
ReplyDeleteHåber du har en dejlig weekend!
- og tusind tak for vejledningen!
This comment has been removed by the author.
ReplyDeleteGreat tutorial- on my long, long, long to-do-someday list now...
ReplyDeleteIt's really a gorgeous present. well done!
A lovely gift -- what lucky little girls to receive them! Thank you very much for the tutorial. I will make one, for my niece, perhaps.
ReplyDeleteThis is really, really cute! What a great tutorial!
ReplyDeleteJeg ønsker meg en spinne-koffort! Håndteiner trenger varsom frakting og jeg har lenge lurt på hva som er lurt. Men nå skal skoeske-løsningen raffineres! Tusen takk for super bloggpost! Og så gjør du det så fint... Veldig inspirerende.
ReplyDeleteVery cute! Come say hi, I am doing another music giveaway to celebrate 1 year of corner views...
ReplyDeleteIt's a very nice work ! Lovely !
ReplyDeleteThis is amazing! Wow. What a way to have a place to carry everything we use. Thank you so much for sharing
ReplyDeleteI love this :) found it over at Shivaya..... such a lovely idea and a perfect gift to pull together for my crafty girls!
ReplyDeleteKjempefine!
ReplyDeleteTakk for ideen og den med Herbariet også